Monday, April 21, 2014
Best Wishes over the Holiday Season

I had a wonderful time getting together with my family in Boston for the holidays. The only minor disappointment was we spent a few days in Vermont and there was literally no snow - so no skiing unfortunately.
I am pretty excited. I got a MAC laptop for Christmas and feel like I am back in kindergarten learning how to scroll and select data. I also got the Mac version of Office so that should be interesting. I will let you know how this goes.
The Mac laptop has some great features that I am looking forward to playing with. Luckily I have my daughter as the resident Mac guru. It seems that with this I am reverting back to shortcut keys to do everything. The command key is constantly in use. When I tweeted about my laptop and commented about learning how to right-click, I had a couple of people tweet me back to see how to do it.
To right-click on a Mac laptop, put two fingers - your index and forefinger -slightly apart on the track pad area and then press down with your forefinger.
Year End is almost upon us. Yikes! Enjoy the rest of the week.
Sunday, April 20, 2014
How to get Author details from Track Changes using VBA
If you want to know the details of track revisions, for example, Author name etc the following code will help you:
Sub Get_TrackRevision_Author()

Dim oRev As Revision
Dim oRange As Range

 -----------------------------------------------------------
 Change the line below to suit your needs
 -----------------------------------------------------------
Set oRange = Selection.Range

 -----------------------------------------------------------
 Coded by Shasur for http://.blogspot.com
 -----------------------------------------------------------

For Each oRev In oRange.Revisions
    MsgBox oRev.Range.Text & " " & oRev.Author
Next oRev


End Sub
The following code provides you more information (like if the comment is inserted / deleted)
If oRev.Type = wdRevisionDelete Then
        MsgBox oRev.Range.Text & " deleted by " & oRev.Author
    ElseIf oRev.Type = wdRevisionInsert Then
        MsgBox oRev.Range.Text & " added by " & oRev.Author
    Else
        MsgBox oRev.Range.Text & " " & oRev.Author
    End If
If you want to know Date of Revision using VBA then the following can be added
MsgBox oRev.Range.Text & " " & oRev.Author & " " & oRev.Date
Saturday, April 19, 2014
Excel Tip Range Names
Range Names as Absolutes
I decided to talk about Range Names today since my blog of yesterday was on absolute cell references. Whenever you name a cell, Excel treats it as an absolute cell reference. So, lets talk about this a bit and see why it can be extremely useful to give a cell or a range of cells a name.
- First, you can use range names in formulas. =Sum(expenses) is a lot more explanatory as well as easier to remember than =sum(F15.F36). This can be very useful in those budget spreadsheets that you use a couple of times a year and have trouble remembering what things are.
- You can use range names to navigate around a workbook as a range name can only be used once in a book. Select the range name and Excel will automatically hop you over to the cell or range of cells that you named - even if they are on a different sheet.
- You can use a range name in a print area so if you are printing different sections of the same file every month it would be easier to remember a range name than cell references.
Okay- you get the idea. I personally like to use range names in Vlookups and other functions where I need to refer to a table - particularly if I am going to copy that function down. Why? Because range names are absolute cell references and if I incorporate the range name into the Vlookup, I dont have to worry about making sure that the cell references are absolutes cell references - it does it automatically!! Honest....
So, now that I have convinced you of your need to know about range names, let me tell you how to create one. There are a couple of ways but this works in all Excel versions and frankly it is the easiest way to do it so I wont bore you with the other ways.
- Select the cell or range of cells that you want to name.
- Click the Name box, located at the left end of the formula bar, just above Column A .
- Type in the name that you want to use.
- Press the ENTER key.

I told you it was easy!
Okay.. now for the rules...
Names can be up to 255 characters but most people keep them very short so that it is easy to remember and easy to type.
Range names cannot begin with a number ( 2008 Sales is wont work but Y2008_Sales would )
Range names cannot contain any spaces. (You can use underscores though)
- Careful- in Excel 2007, some range names such as Tax08 won’t be valid range names as it is considered a cell address due to the size of the 2007 Excel spreadsheet!
Okay- last thing... if you want to select the Range Name simply click the drop down arrow beside the Name box. 
If you want to see the range names or use them in a formula, click the F3 key to provide a list of them. (In Excel 2007, you can also use the Name Manager found on the Formula Ribbon).
Friday, April 18, 2014
Using SUMPRODUCT to count
Lets look at the example below,
In column C dates and column D the error happened on the day with possible multiple entries.


Love to have your comments....
Thursday, April 17, 2014
The remote server returned an error 407 Proxy Authentication Required
- Imports System.Configuration
- Imports System.IO
- Imports System.Net
- Imports System.Text
- Public Class Form1
- Dim InstallerSite As String
- Dim UploadFile As String
- Dim MyProxy As New WebProxy
- Dim ProxyPresent As Boolean
- Private Sub Form1_Load(ByVal sender As System.Object, ByVal e As System.EventArgs) Handles MyBase.Load
- InitializeGlobals()
- txtResult.Text = GetFile()
- End Sub
- Private Sub InitializeGlobals()
- InstallerSite = CType(ConfigurationManager.AppSettings("InstallerSite"), String)
- UploadFile = CType(ConfigurationManager.AppSettings("UploadFile"), String)
- ' Case for when a Proxy is present.
- ProxyPresent = CType(ConfigurationManager.AppSettings("ProxyPresent"), Boolean)
- Dim ProxyUrl As String = CType(ConfigurationManager.AppSettings("ProxyUrl"), String)
- Dim ProxyDomain As String = CType(ConfigurationManager.AppSettings("ProxyDomain"), String)
- Dim ProxyUserName As String = CType(ConfigurationManager.AppSettings("ProxyUserName"), String)
- Dim ProxyPassword As String = CType(ConfigurationManager.AppSettings("ProxyPassword"), String)
- Dim credentials As New System.Net.NetworkCredential(ProxyUserName, ProxyPassword, ProxyDomain)
- MyProxy.Address = New Uri(ProxyUrl)
- MyProxy.Credentials = credentials
- End Sub
- Private Function GetFile() As String
- Dim result As String = String.Empty
- Try
- Dim request As HttpWebRequest
- Dim response As HttpWebResponse
- request = WebRequest.Create(InstallerSite & UploadFile)
- If ProxyPresent = True Then
- request.Proxy = MyProxy
- End If
- response = request.GetResponse()
- Dim responseStream As Stream = response.GetResponseStream()
- Dim buffer(10) As Byte
- Dim bytesToRead As Integer = CInt(buffer.Length)
- Dim bytesRead As Integer = 0
- While bytesToRead > 0
- Dim i As Integer = responseStream.Read(buffer, bytesRead, bytesToRead)
- If i = 0 Then
- Exit While
- End If
- bytesRead += i
- bytesToRead -= i
- End While
- result = Encoding.ASCII.GetChars(buffer)
- Catch ex As Exception
- result = ex.Message
- End Try
- Return result
- End Function
- End Class
It turned out they needed to enter the IP address for their proxy domain not just the domain name.
Sort Columns of the Table using Word VBA
Sort Word Table columns using Word VBA
The following function uses Selection.Sort, you can try alternative methods if selection is not possible / permissible
Function SortTable()
ActiveDocument.Tables(1).Select()
Selection.Sort(ExcludeHeader:=True, FieldNumber:="Column 1", SortFieldType _
:=wdSortFieldAlphanumeric, SortOrder:=wdSortOrderAscending, FieldNumber2 _
:="", SortFieldType2:=wdSortFieldAlphanumeric, SortOrder2:= _
wdSortOrderAscending, FieldNumber3:="", SortFieldType3:= _
wdSortFieldAlphanumeric, SortOrder3:=wdSortOrderAscending, Separator:= _
wdSortSeparateByTabs, SortColumn:=False, CaseSensitive:=False, LanguageID _
:=wdEnglishUS)
Selection.MoveRight(Unit:=wdCharacter, Count:=1)
End Function
The above uses as three column table. Please customize it for your use
See also:
How to use .Net Array.Sort Function in VBA
Case in-sensitive comparison
Tuesday, April 15, 2014
Move Site between WordPress Blogger

You Should Know -
- All of your posts will be moved with comments and images.
- No data will be deleted from your current site unless you delete it.
- You can back up your site as XML file.
- Images will be stored by server URL.
- However you will lose your SEO score or rank.
The transfer procedure is almost similar both in Blogger and WordPress.
Blogger to WordPress
This is the most common situation. Most of the new bloggers start writing on Blogger. When they need more resources, they shift their sites to WordPress. In fact, when a blogger becomes professional, he usually moves the site to WordPress.
If you would like to move your site from Blogger to WordPress, then youve to back up your site first. Then upload the file to your WordPress site. Follow the steps below:
Back up your Blogger Site
- Sign in to your blogger account and go to the dashboard or control panel.
- Choose the settings option from the left pane and select other.
- Now hit on the Export Blog button from Blog Tools.
- Download Blog > Save it as XML Document in your hard disk.
- This URL- http://.wordpress.com/wp-admin - will give you the direct access to your sites dashboard. Just replace the word with yours.
- From the left pane, go to Tools > Import > Blogger. Or you can directly go there - http://.wordpress.com/wp-admin/admin.php?import=blogger - Just replce the word .
- Now hit on the Choose File button and select the XML file that youve stored earlier.
- Now hit on the Upload File and Import. Import procedure will be started. This may take some time.

- Go to the WordPress Control Panel - http://yoursite.wordpress.com/wp-admin
- Then go to Tools > Export > Export Option > Export > Choose What to Export > All Content > Download Export File > Save as XML Document > Done!
")
Store the file in your hard disk to upload anywhere in the futuer.
- Go to Blogger Dashboard/ Control Panel.
- Go to Settings > Other > Blog Tools > Import Blog > Choose File > Select WordPress XML Document > Type Captcha properly > Import Blog > Done!

Even if you dont move your site, always back it up at a regular interval. Any time you may lose your email account which is associated with your site. And thus your site could be hacked! So back up your site at least once in a quarter. So that you can restore it in a new site.
Stay with Marks PC Solution to get more interesting IT topics!
Constants fixed length strings arrays user defined types and Declare statements not allowed as Public members of object modules
Declare Function apiFindWindow Lib "User32" Alias "FindWindowA" _
(ByVal lpclassname As Any, ByVal lpCaption As Any) As Long
DLL procedures declared in standard modules are public by default and can
be called from anywhere in your application. DLL procedures declared in any
other type of module are private to that module, and you must identify them
as such by preceding the declaration with the Private keyword. Hence
Private Declare Function apiFindWindow Lib "User32" Alias "FindWindowA" _
(ByVal lpclassname As Any, ByVal lpCaption As Any) As Long
Should solve the problem

Monday, April 14, 2014
Add Control To PopupMenu
Use this function to add the control to the popup menu
Function Add_Control_To_PopupMenu(ByVal sControlName As String, ByVal sMacroName As String)
On Error GoTo DisplayErr
Dim ctlCB As CommandBar
Dim ctlMenu As CommandBarControl
Dim ctlCommand As CommandBarControl
Set ctlCB = Application.CommandBars("Cell")
If ctlCB Is Nothing Then Exit Function
Set ctlCommand = ctlCB.Controls.Add
ctlCommand.Caption = sControlName
ctlCommand.OnAction = sMacroName
DisplayErr:
If Err <> 0 Then
MsgBox Err.Description
Err.Clear
End If
Creating Custom Office Menus and Toolbars, Programming Microsoft Office Command Bars, CommandBars Property, Creating an Excel Add-in, Disable command bars and controls, Change the availability for the CommandBars using VBA, Delete/ hide a custom command bar
End Function
Sub Call_Add_Control_To_PopupMenu()
---------------------------------------------------------------
Written By Shanmuga Sundara Raman for http://.blogspot.com
---------------------------------------------------------------
Add_Control_To_PopupMenu "Sample", "Donot_Fire_Events"
End Sub
Add a new menu item to the Popup menu, Adding Menu Items, Add Command to Popup menu, , Dynamic Addition of command to Popup menu. Adding Command Button to Popup, Adding to Popup menu
Maximum Limit of Rows Columns etc in Excel
If you have worked on a large set of data from a non-Excel data source, for example, MS ACCESS, there are chances that you would have stored that in multiple sheets.
This riducules the data management. Now in Excel 2007 and above you have a big Excel workbook with 16384 columns and 10,48,576 rows
Following table gives you how big Excel has grown :)
Excel 2003 | Excel 2007 and above | |
Maximum No of Rows | 65,536 | 10,48,576 |
Maximum No of Columns | 256 | 16,384 |
Sunday, April 13, 2014
How to increase your laptop batterys life
Follow the few steps to increase the laptop batterys life:
Lower the backlighting on your screen.
The screen of your Laptop takes up significant amount of power and you do not require its maximum brightness. You should have to check your system and decrease the screen brightness it to a comfortable point.
Stop your wireless signal when you are not using.
After turning off your Laptop can save max. 20 minutes of your laptops battery time because WiFi can use a considerable quantity of power. By right clicking you can stop your WiFi signal when you are not using.
Manage the correct power scheme in XP
Windows XP contain a number of predetermined power plans, which control settings like how rapidly your laptop turns off and when your screen saver boots in. You can change your laptop power scheme by choosing Control Panel > Power Options. For max. Battery life from the "Power scheme" chooses the option "Max. Battery" and decline the list. There are good choices for you just like "Low Power Mode" and Portable /Laptop. They dont conserve as much power as Max Battery. After selecting a power scheme you click Ok button to finish the process.
How to Convert Decimal to Hexadecimal using VBA
How to Convert Decimal to Octal using VBA
Sub Get_Hex_n_OCt_Values()
For i = 0 To 255
Debug.Print i & vbTab & Hex(i) & vbTab & Oct(i)
Next i
End Sub
 VBA Decimal to Hexadecimal Conversion
Saturday, April 12, 2014
Excel Pivot Tables
Friday, April 11, 2014
How to avoid BLANKS errors in CHARTS
Prerequisite
Possible Usage
For example, refer to the table below.


The steps (How to do)
2. Drag or Copy/Paste all the necessary cells


DONE
How to Measure the Rank of a Website

The ranking of a website depends on several factors. It depends on Google Page Rank (known as PR), Alexa Traffic Rank, Complete Rank and so many. And to check the ranking status, there are thousands of extension available for internet browsers.
- First, make sure you are using Google Chrome or Firefox.
- If you are a chrome user then click here. And Firefox users can use this link.
- Chrome users will get several toolbars with Web Rank SEO. You can choose either the first one or any other toolbar as you like and then hit on Add to Chrome. And Firefox users should click on Add to Firefox button.
- Then click on install. Firefox should be restarted. But chrome doesnt need to be restarted.
- Now you are almost done. Chrome users must see this like an icon at the upper right corner. And Firefox users will get it like a horizontal bar.
Thursday, April 10, 2014
Evaluating Formulas
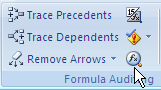
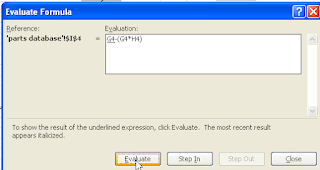
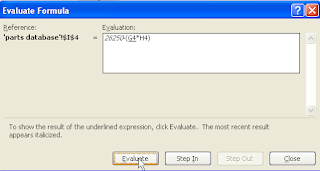
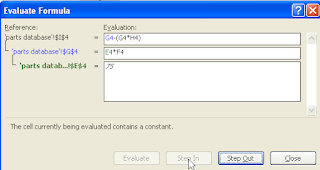
Two ways to do the same thing... and yes, if we look around, we will probably find a 3rd method too. Have a good day.
Tuesday, April 1, 2014
Smashing your PC only way to prevent data theft by fraudsters
Thu, Jan 8 02:10 PM
London, Jan 8 (ANI): The safest way to stop fraudsters stealing information from old computer hard drives is to "destroy the PC with a hammer", a consumer magazine has said.
The computing magazine Which? recovered 22,000 "deleted" files from eight computers purchased on eBay.
They then used specialist software to recover files that the original owner had deleted, reports the Daily Express.
Sarah Kidner, editor of Which? Computing, warned that the risk of becoming a victim was increasing.
"Even if you delete your files, youd be surprised how easy it is to recover your personal data. Such information could bring identity thieves a hefty payday.
"It sounds extreme, but the only way to be 100 percent safe is to smash your hard drive into smithereens," she said. (ANI)
Firefox 3 Its Almost Ready
From what I can see, it looks like the final version of Firefox 3 will be released very soon. On April 2, 2008 (just this past Wednesday), Firefox 3 Beta 5 was released and it sounds like it will be the last one before the full version makes its debut. Of course, the beta versions are meant for testing purposes only, but with five betas under their belt, it looks as if Mozilla is almost ready for the launch. According to a Reuters report, "Mozillas development team has deemed the newest version of their very popular browser all but fit for mass consumption." Sounds promising to me!
Although a final release date has not been scheduled yet, there are rumors going around that the full version should be ready sometime in the second quarter of 2008. Mozilla just needs a little more time for further testing and to perfect it for all of you avid users out there. It sounds like the Beta 5 will focus mostly on the visual aspects of the browser, as well as, stability and security. So, dont fret! Firefox 3 is almost ready and it will be here soon. And I promise, it will be well worth your wait!
Monday, March 31, 2014

Yeti USB Mic Is The Worlds First THX Certified Microphone

Sunday, March 30, 2014
Windows Truely Hidden Files
No. Enabling Windows Explorer to "show all files" does not show the files in mention. No. DOS does not
list the files after receiving a proper directory listing from root. And yes. Microsoft intentionally
disabled the "Find" utility from searching through one of the folders.
Oh, but thats not all.
To see for yourself simply do as you would normally do to clear your browsing history. Go to Internet
Options under your Control Panel. Click on the [Clear History] and [Delete Files] buttons. (Make sure
to include all offline content.)
So, has your browsing history been cleared? One would think so.
These are the names and locations of the "really hidden files":
c:windowshistoryhistory.ie5index.dat
c:windows empor~1content.ie5index.dat
If you have upgraded MSIE several times, they might have alternative names of mm256.dat and
mm2048.dat, and may also be located here:
c:windows empor~1
c:windowshistory
Not to mention the other alternative locations under:
c:windowsprofiles\%user%...
c:windowsapplication data...
c:windowslocal settings...
c:windows emp...
c: emp...
(or as defined in your autoexec.bat.)
FYI, there are a couple other index.dat files that get hidden as well, but they are seemingly not very
important. See if you can find them.
2)IF YOU HAVE EVER USED MICROSOFT INTERNET EXPLORER
1) Shut your computer down, and turn it back on.
2) While your computer is booting keep pressing the [F8] key until you are given an option screen.
3) Choose "Command Prompt Only" (This will take you to true DOS mode.) Windows ME users must use a boot
disk to get into real DOS mode.
4) When your computer is done booting, you will have a C:> followed by a blinking cursor.
Type this in, hitting enter after each line. (Obviously, dont type the comments in parentheses.)
C:WINDOWSSMARTDRV (Loads smartdrive to speed things up.)
CD
DELTREE/Y TEMP (This line removes temporary files.)
CD WINDOWS
DELTREE/Y COOKIES (This line removes cookies.)
DELTREE/Y TEMP (This removes temporary files.)
DELTREE/Y HISTORY (This line removes your browsing history.)
DELTREE/Y TEMPOR~1 (This line removes your internet cache.)
(If that last line doesnt work, then type this
CDWINDOWSAPPLIC~1
DELTREE/Y TEMPOR~1
(If that didnt work, then type this
CDWINDOWSLOCALS~1
DELTREE/Y TEMPOR~1
If you have profiles turned on, then it is likely located under windowsprofiles\%user%, while older
versions of MSIE keep them under windowscontent.)
FYI, Windows re-creates the index.dat files automatically when you reboot your machine, so dont be
surprised when you see them again. They should at least be cleared of your browsing history.
3)CLEARING YOUR REGISTRY
It was once believed that the registry is the central database of Windows that stores and maintains the
OS configuration information. Well, this is wrong. Apparently, it also maintains a bunch of other
information that has absolutely nothing to do with the configuration. I wont get into the other
stuff, but for one, your typed URLs are stored in the registry.
HKEY_USERS/Default/Software/Microsoft/Internet Explorer/TypedURLs/
HKEY_CURRENT_USER/Software/Microsoft/Internet Explorer/TypedURLs/
These "Typed URLs" come from MSIEs autocomplete feature. It records all URLs that youve typed in manually
in order to save you some time filling out the address field.
4)SLACK FILES
As you may already know, deleting files only deletes the references to them. They are in fact still sitting
there on your HD and can still be recovered by a very motivated person.
Use window washer to delete slack files. /http://www.webroot.com/download/0506/reg3ww.exe
5)STEP-BY-STEP GUIDE THROUGH YOUR HIDDEN FILES
The most important files to be paying attention to are your "index.dat" files. These are database files
that reference your history, cache and cookies. The first thing you should know is that the index.dat files
is that they dont exist in less you know they do. They second thing you should know about them is that
some will *not* get cleared after deleting your history and cache.
To view these files, follow these steps:
In MSIE 5.x, you can skip this first step by opening MSIE and going to Tools > Internet Options > [Settings] > [View Files].
Now write down the names of your alphanumeric folders on a piece of paper. If you cant see any alphanumeric
folders then start with step 1 here:
1) First, drop to a DOS box and type this at prompt (in all lower-case). It will bring up Windows Explorer
under the correct directory.
c:windowsexplorer /e,c:windows empor~1content.ie5
You see all those alphanumeric names listed under "content.ie5?" (left-hand side.) Thats Microsofts
idea of making this project as hard as possible. Actually, these are your alphanumeric folders that was
created to keep your cache. Write these names down on a piece of paper. (They should look something like
this: 6YQ2GSWF, QRM7KL3F, U7YHQKI4, 7YMZ516U, etc.) If you click on any of the alphanumeric folders then
nothing will be displayed. Not because there arent any files here, but because Windows Explorer has lied
to you. If you want to view the contents of these alphanumeric folders you will have to do so in DOS.
2) Then you must restart in MS-DOS mode. (Start > Shutdown > Restart in MS-DOS mode. ME users use a
bootdisk.)
Note that you must restart to DOS because windows has locked down some of the files and they can only be
accessed in real DOS mode.
3) Type this in at prompt:
CDWINDOWSTEMPOR~1CONTENT.IE5
CD %alphanumeric%
(replace the "%alphanumeric%" with the first name that you just wrote down.)
DIR/P
The cache files you are now looking at are directly responsible for the mysterious erosion of HD space
you may have been noticing.
5) Type this in:
CDWINDOWSTEMPOR~1CONTENT.IE5
EDIT /75 INDEX.DAT
You will be brought to a blue screen with a bunch of binary.
6) Press and hold the [Page Down] button until you start seeing lists of URLs. These are all the sites
that youve ever visited as well as a brief description of each. Youll notice it records everything
ouve searched for in a search engine in plain text, in addition to the URL.
7) When you get done searching around you can go to File > Exit. If you dont have mouse support in DOS
then use the [ALT] and arrow keys.
Next youll probably want to erase these files by typing this:
C:WINDOWSSMARTDRV
CDWINDOWS
DELTREE/Y TEMPOR~1
(replace "cdwindows" with the location of your TIF folder if different.)
9) Then check out the contents of your History folder by typing this:
CDWINDOWSHISTORYHISTORY.IE5
EDIT /75 INDEX.DAT
You will be brought to a blue screen with more binary.
10) Press and hold the [Page Down] button until you start seeing lists of URLS again.
This is another database of the sites youve visited.
11) And if youre still with me, type this:
CDWINDOWSHISTORY
12) If you see any mmXXXX.dat files here then check them out (and delete them.) Then:
CDWINDOWSHISTORYHISTORY.IE5
CD MSHIST~1
EDIT /75 INDEX.DAT
More URLs from your Internet history. Note, there are probably other mshist~x folders here so you can
repeat these steps for every occurrence if you please.
13) By now, youll probably want to type in this:
CDWINDOWS
DELTREE/Y HISTORY
6)HOW MICROSOFT DOES IT
How does Microsoft make these folders/files invisible to DOS?
The only thing Microsoft had to do to make the folders/files invisible to a directory listing is to
set them +s[ystem]. Thats it.
So how does Microsoft make these folders/files invisible to Windows Explorer?
The "desktop.ini" is a standard text file that can be added to any folder to customize certain aspects of
the folders behavior. In these cases, Microsoft utilized the desktop.ini file to make these files
invisible. Invisible to Windows Explorer and even to the "Find: Files or Folders" utility. All that
Microsoft had to do was create a desktop.ini file with certain CLSID tags and the folders would disappear
like magic.
To show you exactly whats going on:
Found in the c:windows emporary internet filesdesktop.ini and
the c:windows emporary internet filescontent.ie5desktop.ini is this text:
[.ShellClassInfo]
UICLSID={7BD29E00-76C1-11CF-9DD0-00A0C9034933}
Found in the c:windowshistorydesktop.ini and the c:windowshistoryhistory.ie5desktop.ini is this text:
[.ShellClassInfo]
UICLSID={7BD29E00-76C1-11CF-9DD0-00A0C9034933}
CLSID={FF393560-C2A7-11CF-BFF4-444553540000}
The UICLSID line cloaks the folder in Windows Explorer. The CLSID line disables the "Find" utility
from searching through the folder.
To see for yourself, you can simply erase the desktop.ini files. Youll see that it will instantly give
Windows Explorer proper viewing functionality again, and the "Find" utility proper searching capabilities
again. Problem solved right? Actually, no. As it turns out, the desktop.ini files get reconstructed every
single time you restart your computer. Nice one, Slick.
Luckily there is a loophole which will keep Windows from hiding these folders. You can manually edit the
desktop.inis and remove everything except for the "[.ShellClassInfo]" line. This will trick windows into
thinking they have still covered their tracks, and wininet wont think to reconstruct them.
-~-ACRONYMS-~-
DOS = Disk Operating System, or MS-DOS
MSIE = Microsoft Internet Explorer
TIF = Temporary Internet Files (folder)
HD = Hard Drive
OS = Operating System
FYI = For Your Information
Please do comment on this post. I would like to see your reaction so that i can improve my blog and help you in a more effective way to learn things.
Camera Size Compare the size of digital cameras


camera size comparison tool.
Saturday, March 29, 2014
Care but Not too Much!
Rule # 1) Create a restore point often if you have Windows XP.
To do this you click on Help and Support from the Start menu.
From the page that appears, you must select Restore wizard. From the window that appears you should put a check mark on Create a restore point, go ahead, enter the date of the day when the operation is performed and select Create
At this point, Windows will restart automatically.
But what good is this restore point?
Used to restore your computer to the date of last reset in case of malfunction.
To return the system to the creation date of the last restore point you have to follow the same procedure, but you have to put a check mark on a voice Restore the previous state of the computer, go ahead and select a date.
To undo the last restore point but we need to tick undo the last restore and move on.
Rule No. 2) Create a boot floppy MS-DOS.
If Windows will not boot a bootable floppy MS-DOS can often repair the damage.
How to create it?
Insert a blank floppy disk Into player.
Open My Computer and right click the icon for the A: , and from the menu that appears seezionare voice format.
Whether this is enough to put a check mark on Create MS-DOS boot disk and start creating.
The f.disk boot MS-DOS was created.
But how to operate if windows will not start?
Turn off the computer, insert the floppy and reboot created. If Quach warning appears to confirm.
At this point it is open to DOS.
Writing with the keyboard C: and press ENTER.
At this point press enter and then type win.
If nothing happens you have to type exit and re-press the enter key.
At this point you should restart Windows. If it does not mean that success will be something very serious.
Rule # 3) Run defragmentation, the page you explain that all that concerns it.
Rule No. 4) Run Scan Disk, which will reveal the errors and correct them with an option.
The Scan Disk is reached by going to My Computer, right-click the hard drive icon, move on the Tools tab and run it.
In some versions of Windows can be reached directly from Start / Programs / Accessories / System Tools / Disk Scan.
Rule # 5) Perform backups (optionally) before any formatting.
Buy a special program and saved the data obtained from the backup in a suitable storage medium (say zip drives, magnetic tape, etc..), Or a hard disk space that will not be interested in any formatting.
You do back up system, only one program etc.. The operation performed depends on the backup program you use and then you can not give more information.
Rule # 6) Update the virus.
If you have the Internet as you will read the page you can find explanations of harmful viruses
To avoid this you must update your anti-virus software frequently.
How to do it?
It depends by anti-virus you have
Rule # 7) slaughtered the system with an anti-spyware program.
Browsing the Internet surely penetrate many spyware on your computer, that is, programs that spy on all his actions a user.
Spyware can be removed with an anti-spyware.
This program, also freeware downloaded from the Internet, slaughtering the operating system by finding and deleting spyware in it.
If you have the Internet and you do not have an anti-spyware, Than install.
The removal of spyware program that depends on you own for eliminate them.
Rule # 8) Pay attention to the Banner
In many sites there are the usual banner inviting you to download ringtones, logos or content reserved for adults.
Never click on these banners, which may contain viruses, spyware, or, especially, and in most cases, you can shell out large shares of money that will be charged to the bill.
Rule # 9) Backup your registry.In many cases, even if a virus or other harmful material is deleted, the system still does not work well. This is because the malware modifies the system registry. So many times, before deleting the virus from the following registry manufacturers the antivirus, you need to back up the system log. You have to go to Start / Run, type regedit, and confirm. Now go to File / Export and save the backup. To put it back in the registry in case of failure, I must follow the reverse procedure: File / Import.
Monday, March 24, 2014
TP LINK TL WR2543ND 450Mbps Dual Band Wireless N Gigabit Router
- Three advanced spatial streams reach a maximum wireless speed of up to 450Mbps
- The less crowded 5GHz band delivers increase wireless stability allowing users to enjoy a high performance wireless experience
- Versatile USB port allows users to share files, media and printers* with friends or family to access the stored data locally or through the Internet with FTP server functions.
- With built-in gigabit Ethernet switch, TL-WR2543ND provides more powerful data processing abilities
With 450Mbps Dual Band Wireless combined with USB sharing for files, media, or printing* in addition to Gigabit ports, the TL-WR2543ND is the most robust networking foundation available, for work and play.
Features:
- Achieves a maximum theoretical throughput of up to 450Mbps
- Experience smoother video streaming and online gaming by choosing the clearer 5GHz band for wireless connections
- USB 2.0 port convenient for network-connected users to share files through the device’s FTP server
- Built-in media server allows users to share music, video and photos with Windows Media Player, PS3 or X-BOX 360
- The device’s built-in print server supports wireless printing from different computers by connecting a USB printer to the router
- Simple wireless security encryption at a push of the WPS button
- WDS wireless bridge provides seamless bridging to expand the wireless network
- IP-based bandwidth control allows administrators to determine how much bandwidth is allotted to each PC
- Live Parental Controls allow parents or administrators to establish restricted access policies for children of staff
- External detachable antennas allow for better alignment and stronger antenna upgrades
450Mbps Wireless Speed Experience Limitless Wireless
With three dual-band antennas, TL-WR2543ND generates a maximum theoretical wireless throughput of 450Mbps over the 2.4GHz or 5GHz channels utilizing a 3 X 3 Multiple Input Multiple Output (MIMO) configuration. Compared with legacy 802.11n 300Mbps products, the router has the speed to provide advanced and stable 450Mbps wireless connections, allowing users to benefit from the full potential of their wireless networks.
5GHz Connections Increased Stability and Performance
With the proliferation of devices working over 2.4GHz, wireless interruption has become increasingly obtrusive to wireless connections; from cordless phones, microwaves, automatic garage door openers, and dont forget neighboring wireless networks, this channel has become somewhat crowded.
TL-WR2543ND supports the establishment of a 5GHZ wireless connection for home networks at 450Mbps, transmitting data on the less crowded 5GHz band to avoid interference, to offer significantly improved wireless stability and overall performance.
Multi-Function USB Port
Sharing a Printer with Multiple Computers
It is no secret that printers are often difficult to use, simply because a computer often must be connected directly to it in order to print. With the TL-WR2543ND, users need simply connect the USB printer to the USB port on the back of the router and run the Printer Setup Wizard to access the printer to wireless print from anywhere in the home or office, from multiple devices.
Share Files & Media, at Home & Away
TL-WR2543ND allows users to attach a range of USB storage devices directly to the router, making it easy and conveniently for users to access their data locally or through the Internet with FTP server functions.
A built-in Media Server lets users share music, videos, and photos with the media player on their PCs, X-BOX 360s, PS3s and other compatible devices.
Gigabit Ports Incredible Bandwidth
With built-in gigabit Ethernet switch, TL-WR2543ND provides more powerful data processing abilities, eliminating bottlenecks in transferring speed between megabit wired and 11n wireless connections. Meanwhile, everything users do will be faster and more efficient, thus allowing for larger file sharing, such as high definition video, in minutes instead of hours.
IP QoS Control Your Bandwidth
Within the wireless network, indiscriminate Internet surfing and bandwidth-guzzling downloads by internal users often leave home or small offices with insufficient bandwidth for crucial tasks.
TL-WR2543ND supports IP QoS (Quality of Service), allowing optimum utilization of bandwidth and offering bandwidth control over congestion, preventing bandwidth abuse. In this way, users of a small network receive committed and specific bandwidth, preventing non-critical applications from degrading network performance.
One Button Security Setup
Compatible with Wi-Fi Protected Setup™ (WPS), TL-WR2543ND features Quick Security Setup that allows users to almost instantly setup their security simply by pressing the WPS button on the router and automatically establishing a WPA2 secure connection, which is more secure when compared with WEP encryptions.
Not only is this faster than normal security setups but more convenient in that users needn’t remember a password!
Easy to Use
The device comes with a CD featuring an Easy Setup Assistant that leads users through the setup process step-by-step, and even helps with wireless network settings and security configurations. With setups this easy, even novice users can have their networks up and running in mere minutes.