Monday, March 31, 2014

Yeti USB Mic Is The Worlds First THX Certified Microphone

At $150, Blue Microphones new THX certified Yeti might not be the best investment for something as simple as Skype, but if you are doing podcasts, music recordings, or old-timey variety shows, it might be worth the extra cash.
Apparently, the Yeti is the first microphone to earn a THX certified distinction—something Blue Microphone views as a validation of its "incredibly low distortion, high fidelity, and balanced frequency response." Features include: a triple capsule array that allows you to record in stereo, cardioid, omnidirectional, and bidirectional, an analog to digital converter and a built-in headphone amp for zero-latency monitoring. And the whole thing is ready to plug in to a USB port and use on your PC or Mac right out of the box.
Blue Microphones Announces Worlds First THX Certified Microphone, the Yeti USB Condenser Mic
Featuring condenser capsules in a triple array, Yeti is the latest, most advanced addition to Blues line of premium USB microphones
(Westlake Village, California –November 10, 2009) – Blue Microphones (www.bluemic.com), a leading innovator in microphone technology and design, announces Yeti, the first THX® Certified microphone. The latest addition to Blues new consumer line, the Yeti is the ultimate USB microphone for professional recording. The Yeti features:
· The first USB mic to offer Blues premium condenser capsules in a proprietary triple capsule array for the highest quality, most versatile audio recording capability
· After rigorous lab testing, THX certification affirms the ultimate in recording and playback fidelity thanks to superior design and quality
· Four patterns (Omni, Cardioid, Stereo, Bidirectional) for incredible versatility and superior results in any situation
· Studio quality performance and features, with zero latency, amplified headphone monitoring, microphone mute, and hardware-based gain adjustment
Yeti is the first microphone to offer the quality and range of versatility to produce the best quality recordings in a wide range of situations, including podcasts, vocals, live or event recording, interviews, broadcasts, instruments, bands and more.
"Blue Microphones recognizes THX as a benchmark within the industry for professional audio production and playback. We, are honored to be recognized as their first partner for audio input," says John Maier, CEO of Blue Microphones. "Blue strives to provide the highest quality sound for both professionals and consumers alike and we are proud to provide such recognized quality with the new Yeti, the worlds first THX Certified microphone."
Building upon the technology foundation established by the award-winning Snowball USB microphone, Yeti adds four distinct pattern modes, a zero-latency headphone output with volume control for direct monitoring, adjustable microphone gain control and a mute button. The Yetis angle can be adjusted on its custom-designed desk stand. Following suit with the rest of Blues desktop products, the Yeti features driverless installation and works with both PC and Mac.
"The THX Certified Yeti from Blue Microphones provides aspiring artists a recording solution that combines quality, usability and convenience for a wide range of audio applications," explains Matthew Chrispen, director of certification at THX. "THX testing and certification ensures the fidelity of the recording always remains true to its source, allowing artists to accurately capture voice-overs, interviews and other sound elements with confidence."
The Yeti, MSRP $149.99, will be available beginning December 2009, at Apple, CompUSA, Frys Electronics, Guitar Center, other fine pro-audio and consumer electronics retailers and online at Amazon.com. For complete details, visitwww.bluemic.com.

Sunday, March 30, 2014
Windows Truely Hidden Files
1)SEEING IS BELIEVING
No. Enabling Windows Explorer to "show all files" does not show the files in mention. No. DOS does not
list the files after receiving a proper directory listing from root. And yes. Microsoft intentionally
disabled the "Find" utility from searching through one of the folders.
Oh, but thats not all.
To see for yourself simply do as you would normally do to clear your browsing history. Go to Internet
Options under your Control Panel. Click on the [Clear History] and [Delete Files] buttons. (Make sure
to include all offline content.)
So, has your browsing history been cleared? One would think so.
These are the names and locations of the "really hidden files":
c:windowshistoryhistory.ie5index.dat
c:windows empor~1content.ie5index.dat
If you have upgraded MSIE several times, they might have alternative names of mm256.dat and
mm2048.dat, and may also be located here:
c:windows empor~1
c:windowshistory
Not to mention the other alternative locations under:
c:windowsprofiles\%user%...
c:windowsapplication data...
c:windowslocal settings...
c:windows emp...
c: emp...
(or as defined in your autoexec.bat.)
FYI, there are a couple other index.dat files that get hidden as well, but they are seemingly not very
important. See if you can find them.
2)IF YOU HAVE EVER USED MICROSOFT INTERNET EXPLORER
1) Shut your computer down, and turn it back on.
2) While your computer is booting keep pressing the [F8] key until you are given an option screen.
3) Choose "Command Prompt Only" (This will take you to true DOS mode.) Windows ME users must use a boot
disk to get into real DOS mode.
4) When your computer is done booting, you will have a C:> followed by a blinking cursor.
Type this in, hitting enter after each line. (Obviously, dont type the comments in parentheses.)
C:WINDOWSSMARTDRV (Loads smartdrive to speed things up.)
CD
DELTREE/Y TEMP (This line removes temporary files.)
CD WINDOWS
DELTREE/Y COOKIES (This line removes cookies.)
DELTREE/Y TEMP (This removes temporary files.)
DELTREE/Y HISTORY (This line removes your browsing history.)
DELTREE/Y TEMPOR~1 (This line removes your internet cache.)
(If that last line doesnt work, then type this
CDWINDOWSAPPLIC~1
DELTREE/Y TEMPOR~1
(If that didnt work, then type this
CDWINDOWSLOCALS~1
DELTREE/Y TEMPOR~1
If you have profiles turned on, then it is likely located under windowsprofiles\%user%, while older
versions of MSIE keep them under windowscontent.)
FYI, Windows re-creates the index.dat files automatically when you reboot your machine, so dont be
surprised when you see them again. They should at least be cleared of your browsing history.
3)CLEARING YOUR REGISTRY
It was once believed that the registry is the central database of Windows that stores and maintains the
OS configuration information. Well, this is wrong. Apparently, it also maintains a bunch of other
information that has absolutely nothing to do with the configuration. I wont get into the other
stuff, but for one, your typed URLs are stored in the registry.
HKEY_USERS/Default/Software/Microsoft/Internet Explorer/TypedURLs/
HKEY_CURRENT_USER/Software/Microsoft/Internet Explorer/TypedURLs/
These "Typed URLs" come from MSIEs autocomplete feature. It records all URLs that youve typed in manually
in order to save you some time filling out the address field.
4)SLACK FILES
As you may already know, deleting files only deletes the references to them. They are in fact still sitting
there on your HD and can still be recovered by a very motivated person.
Use window washer to delete slack files. /http://www.webroot.com/download/0506/reg3ww.exe
5)STEP-BY-STEP GUIDE THROUGH YOUR HIDDEN FILES
The most important files to be paying attention to are your "index.dat" files. These are database files
that reference your history, cache and cookies. The first thing you should know is that the index.dat files
is that they dont exist in less you know they do. They second thing you should know about them is that
some will *not* get cleared after deleting your history and cache.
To view these files, follow these steps:
In MSIE 5.x, you can skip this first step by opening MSIE and going to Tools > Internet Options > [Settings] > [View Files].
Now write down the names of your alphanumeric folders on a piece of paper. If you cant see any alphanumeric
folders then start with step 1 here:
1) First, drop to a DOS box and type this at prompt (in all lower-case). It will bring up Windows Explorer
under the correct directory.
c:windowsexplorer /e,c:windows empor~1content.ie5
You see all those alphanumeric names listed under "content.ie5?" (left-hand side.) Thats Microsofts
idea of making this project as hard as possible. Actually, these are your alphanumeric folders that was
created to keep your cache. Write these names down on a piece of paper. (They should look something like
this: 6YQ2GSWF, QRM7KL3F, U7YHQKI4, 7YMZ516U, etc.) If you click on any of the alphanumeric folders then
nothing will be displayed. Not because there arent any files here, but because Windows Explorer has lied
to you. If you want to view the contents of these alphanumeric folders you will have to do so in DOS.
2) Then you must restart in MS-DOS mode. (Start > Shutdown > Restart in MS-DOS mode. ME users use a
bootdisk.)
Note that you must restart to DOS because windows has locked down some of the files and they can only be
accessed in real DOS mode.
3) Type this in at prompt:
CDWINDOWSTEMPOR~1CONTENT.IE5
CD %alphanumeric%
(replace the "%alphanumeric%" with the first name that you just wrote down.)
DIR/P
The cache files you are now looking at are directly responsible for the mysterious erosion of HD space
you may have been noticing.
5) Type this in:
CDWINDOWSTEMPOR~1CONTENT.IE5
EDIT /75 INDEX.DAT
You will be brought to a blue screen with a bunch of binary.
6) Press and hold the [Page Down] button until you start seeing lists of URLs. These are all the sites
that youve ever visited as well as a brief description of each. Youll notice it records everything
ouve searched for in a search engine in plain text, in addition to the URL.
7) When you get done searching around you can go to File > Exit. If you dont have mouse support in DOS
then use the [ALT] and arrow keys.
Next youll probably want to erase these files by typing this:
C:WINDOWSSMARTDRV
CDWINDOWS
DELTREE/Y TEMPOR~1
(replace "cdwindows" with the location of your TIF folder if different.)
9) Then check out the contents of your History folder by typing this:
CDWINDOWSHISTORYHISTORY.IE5
EDIT /75 INDEX.DAT
You will be brought to a blue screen with more binary.
10) Press and hold the [Page Down] button until you start seeing lists of URLS again.
This is another database of the sites youve visited.
11) And if youre still with me, type this:
CDWINDOWSHISTORY
12) If you see any mmXXXX.dat files here then check them out (and delete them.) Then:
CDWINDOWSHISTORYHISTORY.IE5
CD MSHIST~1
EDIT /75 INDEX.DAT
More URLs from your Internet history. Note, there are probably other mshist~x folders here so you can
repeat these steps for every occurrence if you please.
13) By now, youll probably want to type in this:
CDWINDOWS
DELTREE/Y HISTORY
6)HOW MICROSOFT DOES IT
How does Microsoft make these folders/files invisible to DOS?
The only thing Microsoft had to do to make the folders/files invisible to a directory listing is to
set them +s[ystem]. Thats it.
So how does Microsoft make these folders/files invisible to Windows Explorer?
The "desktop.ini" is a standard text file that can be added to any folder to customize certain aspects of
the folders behavior. In these cases, Microsoft utilized the desktop.ini file to make these files
invisible. Invisible to Windows Explorer and even to the "Find: Files or Folders" utility. All that
Microsoft had to do was create a desktop.ini file with certain CLSID tags and the folders would disappear
like magic.
To show you exactly whats going on:
Found in the c:windows emporary internet filesdesktop.ini and
the c:windows emporary internet filescontent.ie5desktop.ini is this text:
[.ShellClassInfo]
UICLSID={7BD29E00-76C1-11CF-9DD0-00A0C9034933}
Found in the c:windowshistorydesktop.ini and the c:windowshistoryhistory.ie5desktop.ini is this text:
[.ShellClassInfo]
UICLSID={7BD29E00-76C1-11CF-9DD0-00A0C9034933}
CLSID={FF393560-C2A7-11CF-BFF4-444553540000}
The UICLSID line cloaks the folder in Windows Explorer. The CLSID line disables the "Find" utility
from searching through the folder.
To see for yourself, you can simply erase the desktop.ini files. Youll see that it will instantly give
Windows Explorer proper viewing functionality again, and the "Find" utility proper searching capabilities
again. Problem solved right? Actually, no. As it turns out, the desktop.ini files get reconstructed every
single time you restart your computer. Nice one, Slick.
Luckily there is a loophole which will keep Windows from hiding these folders. You can manually edit the
desktop.inis and remove everything except for the "[.ShellClassInfo]" line. This will trick windows into
thinking they have still covered their tracks, and wininet wont think to reconstruct them.
-~-ACRONYMS-~-
DOS = Disk Operating System, or MS-DOS
MSIE = Microsoft Internet Explorer
TIF = Temporary Internet Files (folder)
HD = Hard Drive
OS = Operating System
FYI = For Your Information
Please do comment on this post. I would like to see your reaction so that i can improve my blog and help you in a more effective way to learn things.
Read more »
No. Enabling Windows Explorer to "show all files" does not show the files in mention. No. DOS does not
list the files after receiving a proper directory listing from root. And yes. Microsoft intentionally
disabled the "Find" utility from searching through one of the folders.
Oh, but thats not all.
To see for yourself simply do as you would normally do to clear your browsing history. Go to Internet
Options under your Control Panel. Click on the [Clear History] and [Delete Files] buttons. (Make sure
to include all offline content.)
So, has your browsing history been cleared? One would think so.
These are the names and locations of the "really hidden files":
c:windowshistoryhistory.ie5index.dat
c:windows empor~1content.ie5index.dat
If you have upgraded MSIE several times, they might have alternative names of mm256.dat and
mm2048.dat, and may also be located here:
c:windows empor~1
c:windowshistory
Not to mention the other alternative locations under:
c:windowsprofiles\%user%...
c:windowsapplication data...
c:windowslocal settings...
c:windows emp...
c: emp...
(or as defined in your autoexec.bat.)
FYI, there are a couple other index.dat files that get hidden as well, but they are seemingly not very
important. See if you can find them.
2)IF YOU HAVE EVER USED MICROSOFT INTERNET EXPLORER
1) Shut your computer down, and turn it back on.
2) While your computer is booting keep pressing the [F8] key until you are given an option screen.
3) Choose "Command Prompt Only" (This will take you to true DOS mode.) Windows ME users must use a boot
disk to get into real DOS mode.
4) When your computer is done booting, you will have a C:> followed by a blinking cursor.
Type this in, hitting enter after each line. (Obviously, dont type the comments in parentheses.)
C:WINDOWSSMARTDRV (Loads smartdrive to speed things up.)
CD
DELTREE/Y TEMP (This line removes temporary files.)
CD WINDOWS
DELTREE/Y COOKIES (This line removes cookies.)
DELTREE/Y TEMP (This removes temporary files.)
DELTREE/Y HISTORY (This line removes your browsing history.)
DELTREE/Y TEMPOR~1 (This line removes your internet cache.)
(If that last line doesnt work, then type this
CDWINDOWSAPPLIC~1
DELTREE/Y TEMPOR~1
(If that didnt work, then type this
CDWINDOWSLOCALS~1
DELTREE/Y TEMPOR~1
If you have profiles turned on, then it is likely located under windowsprofiles\%user%, while older
versions of MSIE keep them under windowscontent.)
FYI, Windows re-creates the index.dat files automatically when you reboot your machine, so dont be
surprised when you see them again. They should at least be cleared of your browsing history.
3)CLEARING YOUR REGISTRY
It was once believed that the registry is the central database of Windows that stores and maintains the
OS configuration information. Well, this is wrong. Apparently, it also maintains a bunch of other
information that has absolutely nothing to do with the configuration. I wont get into the other
stuff, but for one, your typed URLs are stored in the registry.
HKEY_USERS/Default/Software/Microsoft/Internet Explorer/TypedURLs/
HKEY_CURRENT_USER/Software/Microsoft/Internet Explorer/TypedURLs/
These "Typed URLs" come from MSIEs autocomplete feature. It records all URLs that youve typed in manually
in order to save you some time filling out the address field.
4)SLACK FILES
As you may already know, deleting files only deletes the references to them. They are in fact still sitting
there on your HD and can still be recovered by a very motivated person.
Use window washer to delete slack files. /http://www.webroot.com/download/0506/reg3ww.exe
5)STEP-BY-STEP GUIDE THROUGH YOUR HIDDEN FILES
The most important files to be paying attention to are your "index.dat" files. These are database files
that reference your history, cache and cookies. The first thing you should know is that the index.dat files
is that they dont exist in less you know they do. They second thing you should know about them is that
some will *not* get cleared after deleting your history and cache.
To view these files, follow these steps:
In MSIE 5.x, you can skip this first step by opening MSIE and going to Tools > Internet Options > [Settings] > [View Files].
Now write down the names of your alphanumeric folders on a piece of paper. If you cant see any alphanumeric
folders then start with step 1 here:
1) First, drop to a DOS box and type this at prompt (in all lower-case). It will bring up Windows Explorer
under the correct directory.
c:windowsexplorer /e,c:windows empor~1content.ie5
You see all those alphanumeric names listed under "content.ie5?" (left-hand side.) Thats Microsofts
idea of making this project as hard as possible. Actually, these are your alphanumeric folders that was
created to keep your cache. Write these names down on a piece of paper. (They should look something like
this: 6YQ2GSWF, QRM7KL3F, U7YHQKI4, 7YMZ516U, etc.) If you click on any of the alphanumeric folders then
nothing will be displayed. Not because there arent any files here, but because Windows Explorer has lied
to you. If you want to view the contents of these alphanumeric folders you will have to do so in DOS.
2) Then you must restart in MS-DOS mode. (Start > Shutdown > Restart in MS-DOS mode. ME users use a
bootdisk.)
Note that you must restart to DOS because windows has locked down some of the files and they can only be
accessed in real DOS mode.
3) Type this in at prompt:
CDWINDOWSTEMPOR~1CONTENT.IE5
CD %alphanumeric%
(replace the "%alphanumeric%" with the first name that you just wrote down.)
DIR/P
The cache files you are now looking at are directly responsible for the mysterious erosion of HD space
you may have been noticing.
5) Type this in:
CDWINDOWSTEMPOR~1CONTENT.IE5
EDIT /75 INDEX.DAT
You will be brought to a blue screen with a bunch of binary.
6) Press and hold the [Page Down] button until you start seeing lists of URLs. These are all the sites
that youve ever visited as well as a brief description of each. Youll notice it records everything
ouve searched for in a search engine in plain text, in addition to the URL.
7) When you get done searching around you can go to File > Exit. If you dont have mouse support in DOS
then use the [ALT] and arrow keys.
Next youll probably want to erase these files by typing this:
C:WINDOWSSMARTDRV
CDWINDOWS
DELTREE/Y TEMPOR~1
(replace "cdwindows" with the location of your TIF folder if different.)
9) Then check out the contents of your History folder by typing this:
CDWINDOWSHISTORYHISTORY.IE5
EDIT /75 INDEX.DAT
You will be brought to a blue screen with more binary.
10) Press and hold the [Page Down] button until you start seeing lists of URLS again.
This is another database of the sites youve visited.
11) And if youre still with me, type this:
CDWINDOWSHISTORY
12) If you see any mmXXXX.dat files here then check them out (and delete them.) Then:
CDWINDOWSHISTORYHISTORY.IE5
CD MSHIST~1
EDIT /75 INDEX.DAT
More URLs from your Internet history. Note, there are probably other mshist~x folders here so you can
repeat these steps for every occurrence if you please.
13) By now, youll probably want to type in this:
CDWINDOWS
DELTREE/Y HISTORY
6)HOW MICROSOFT DOES IT
How does Microsoft make these folders/files invisible to DOS?
The only thing Microsoft had to do to make the folders/files invisible to a directory listing is to
set them +s[ystem]. Thats it.
So how does Microsoft make these folders/files invisible to Windows Explorer?
The "desktop.ini" is a standard text file that can be added to any folder to customize certain aspects of
the folders behavior. In these cases, Microsoft utilized the desktop.ini file to make these files
invisible. Invisible to Windows Explorer and even to the "Find: Files or Folders" utility. All that
Microsoft had to do was create a desktop.ini file with certain CLSID tags and the folders would disappear
like magic.
To show you exactly whats going on:
Found in the c:windows emporary internet filesdesktop.ini and
the c:windows emporary internet filescontent.ie5desktop.ini is this text:
[.ShellClassInfo]
UICLSID={7BD29E00-76C1-11CF-9DD0-00A0C9034933}
Found in the c:windowshistorydesktop.ini and the c:windowshistoryhistory.ie5desktop.ini is this text:
[.ShellClassInfo]
UICLSID={7BD29E00-76C1-11CF-9DD0-00A0C9034933}
CLSID={FF393560-C2A7-11CF-BFF4-444553540000}
The UICLSID line cloaks the folder in Windows Explorer. The CLSID line disables the "Find" utility
from searching through the folder.
To see for yourself, you can simply erase the desktop.ini files. Youll see that it will instantly give
Windows Explorer proper viewing functionality again, and the "Find" utility proper searching capabilities
again. Problem solved right? Actually, no. As it turns out, the desktop.ini files get reconstructed every
single time you restart your computer. Nice one, Slick.
Luckily there is a loophole which will keep Windows from hiding these folders. You can manually edit the
desktop.inis and remove everything except for the "[.ShellClassInfo]" line. This will trick windows into
thinking they have still covered their tracks, and wininet wont think to reconstruct them.
-~-ACRONYMS-~-
DOS = Disk Operating System, or MS-DOS
MSIE = Microsoft Internet Explorer
TIF = Temporary Internet Files (folder)
HD = Hard Drive
OS = Operating System
FYI = For Your Information
Please do comment on this post. I would like to see your reaction so that i can improve my blog and help you in a more effective way to learn things.
Camera Size Compare the size of digital cameras
Thinking of buying a digital camera for your next vacation? Here is a online service that will help you easily view the different sizes of cameras. While many tools exist to compare technical characteristics, Camera Size lets you know the size of each camera.
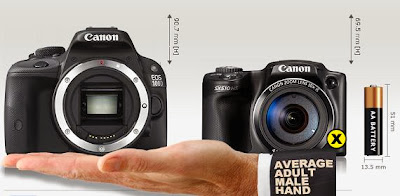
Camera Size is a user-friendly web application that displays the exact dimensions of digital cameras to better compare. Operation is easy, just choose the two cameras that you want to compare from the drop-down list, and you’ll get the photo and the size of each camera.
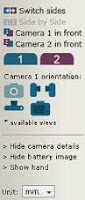
At the right side you can see an image of a regular AA Battery, which gives you an option to visualize the size of the camera. If that’s not enough, you can initialize a helper image of an average human male hand by clicking on the “Show hand”. You can drag this image around and position it under each camera and better visualize the size of the camera.
camera size comparison tool.
Saturday, March 29, 2014
Care but Not too Much!
For proper operation of the computer is always better to be cautious. But how? Now well see.
Rule # 1) Create a restore point often if you have Windows XP.
To do this you click on Help and Support from the Start menu.
From the page that appears, you must select Restore wizard. From the window that appears you should put a check mark on Create a restore point, go ahead, enter the date of the day when the operation is performed and select Create
At this point, Windows will restart automatically.
But what good is this restore point?
Used to restore your computer to the date of last reset in case of malfunction.
To return the system to the creation date of the last restore point you have to follow the same procedure, but you have to put a check mark on a voice Restore the previous state of the computer, go ahead and select a date.
To undo the last restore point but we need to tick undo the last restore and move on.
Rule No. 2) Create a boot floppy MS-DOS.
If Windows will not boot a bootable floppy MS-DOS can often repair the damage.
How to create it?
Insert a blank floppy disk Into player.
Open My Computer and right click the icon for the A: , and from the menu that appears seezionare voice format.
Whether this is enough to put a check mark on Create MS-DOS boot disk and start creating.
The f.disk boot MS-DOS was created.
But how to operate if windows will not start?
Turn off the computer, insert the floppy and reboot created. If Quach warning appears to confirm.
At this point it is open to DOS.
Writing with the keyboard C: and press ENTER.
At this point press enter and then type win.
If nothing happens you have to type exit and re-press the enter key.
At this point you should restart Windows. If it does not mean that success will be something very serious.
Rule # 3) Run defragmentation, the page you explain that all that concerns it.
Rule No. 4) Run Scan Disk, which will reveal the errors and correct them with an option.
The Scan Disk is reached by going to My Computer, right-click the hard drive icon, move on the Tools tab and run it.
In some versions of Windows can be reached directly from Start / Programs / Accessories / System Tools / Disk Scan.
Rule # 5) Perform backups (optionally) before any formatting.
Buy a special program and saved the data obtained from the backup in a suitable storage medium (say zip drives, magnetic tape, etc..), Or a hard disk space that will not be interested in any formatting.
You do back up system, only one program etc.. The operation performed depends on the backup program you use and then you can not give more information.
Rule # 6) Update the virus.
If you have the Internet as you will read the page you can find explanations of harmful viruses
To avoid this you must update your anti-virus software frequently.
How to do it?
It depends by anti-virus you have
Rule # 7) slaughtered the system with an anti-spyware program.
Browsing the Internet surely penetrate many spyware on your computer, that is, programs that spy on all his actions a user.
Spyware can be removed with an anti-spyware.
This program, also freeware downloaded from the Internet, slaughtering the operating system by finding and deleting spyware in it.
If you have the Internet and you do not have an anti-spyware, Than install.
The removal of spyware program that depends on you own for eliminate them.
Rule # 8) Pay attention to the Banner
In many sites there are the usual banner inviting you to download ringtones, logos or content reserved for adults.
Never click on these banners, which may contain viruses, spyware, or, especially, and in most cases, you can shell out large shares of money that will be charged to the bill.
Rule # 9) Backup your registry.In many cases, even if a virus or other harmful material is deleted, the system still does not work well. This is because the malware modifies the system registry. So many times, before deleting the virus from the following registry manufacturers the antivirus, you need to back up the system log. You have to go to Start / Run, type regedit, and confirm. Now go to File / Export and save the backup. To put it back in the registry in case of failure, I must follow the reverse procedure: File / Import.
Rule # 1) Create a restore point often if you have Windows XP.
To do this you click on Help and Support from the Start menu.
From the page that appears, you must select Restore wizard. From the window that appears you should put a check mark on Create a restore point, go ahead, enter the date of the day when the operation is performed and select Create
At this point, Windows will restart automatically.
But what good is this restore point?
Used to restore your computer to the date of last reset in case of malfunction.
To return the system to the creation date of the last restore point you have to follow the same procedure, but you have to put a check mark on a voice Restore the previous state of the computer, go ahead and select a date.
To undo the last restore point but we need to tick undo the last restore and move on.
Rule No. 2) Create a boot floppy MS-DOS.
If Windows will not boot a bootable floppy MS-DOS can often repair the damage.
How to create it?
Insert a blank floppy disk Into player.
Open My Computer and right click the icon for the A: , and from the menu that appears seezionare voice format.
Whether this is enough to put a check mark on Create MS-DOS boot disk and start creating.
The f.disk boot MS-DOS was created.
But how to operate if windows will not start?
Turn off the computer, insert the floppy and reboot created. If Quach warning appears to confirm.
At this point it is open to DOS.
Writing with the keyboard C: and press ENTER.
At this point press enter and then type win.
If nothing happens you have to type exit and re-press the enter key.
At this point you should restart Windows. If it does not mean that success will be something very serious.
Rule # 3) Run defragmentation, the page you explain that all that concerns it.
Rule No. 4) Run Scan Disk, which will reveal the errors and correct them with an option.
The Scan Disk is reached by going to My Computer, right-click the hard drive icon, move on the Tools tab and run it.
In some versions of Windows can be reached directly from Start / Programs / Accessories / System Tools / Disk Scan.
Rule # 5) Perform backups (optionally) before any formatting.
Buy a special program and saved the data obtained from the backup in a suitable storage medium (say zip drives, magnetic tape, etc..), Or a hard disk space that will not be interested in any formatting.
You do back up system, only one program etc.. The operation performed depends on the backup program you use and then you can not give more information.
Rule # 6) Update the virus.
If you have the Internet as you will read the page you can find explanations of harmful viruses
To avoid this you must update your anti-virus software frequently.
How to do it?
It depends by anti-virus you have
Rule # 7) slaughtered the system with an anti-spyware program.
Browsing the Internet surely penetrate many spyware on your computer, that is, programs that spy on all his actions a user.
Spyware can be removed with an anti-spyware.
This program, also freeware downloaded from the Internet, slaughtering the operating system by finding and deleting spyware in it.
If you have the Internet and you do not have an anti-spyware, Than install.
The removal of spyware program that depends on you own for eliminate them.
Rule # 8) Pay attention to the Banner
In many sites there are the usual banner inviting you to download ringtones, logos or content reserved for adults.
Never click on these banners, which may contain viruses, spyware, or, especially, and in most cases, you can shell out large shares of money that will be charged to the bill.
Rule # 9) Backup your registry.In many cases, even if a virus or other harmful material is deleted, the system still does not work well. This is because the malware modifies the system registry. So many times, before deleting the virus from the following registry manufacturers the antivirus, you need to back up the system log. You have to go to Start / Run, type regedit, and confirm. Now go to File / Export and save the backup. To put it back in the registry in case of failure, I must follow the reverse procedure: File / Import.
Subscribe to:
Posts (Atom)